Monday, February 20, 2012

How to Clone a RTW Bra

Making a pattern from a RTW bra is more art than science – with a little good luck thrown in. Working with stretchy fabric and shrunken elastics in tight curves is challenging! But if you have a ready-made bra that fits perfectly, it’s worth the effort.

I know of two ways to accomplish the task: 1) cutting apart a bra then tracing the pieces, and 2) leaving the bra intact and pin-tracing each piece.

Cutting apart a perfectly good bra may seem like a terrible waste but it is the easiest and most accurate way (in my opinion) of creating a pattern from a finished garment. In her fabulous book, Making Beautiful Bras, Lee-Ann Burgess describes how to proceed in detail. To sum it up, you cut one cup along the seamlines, leaving the other cup intact (so you can refer to it as needed). Trace the cut pieces, add seam allowances, then recreate the bra using a fabric with the same stretchiness and weight as the original. For the easily intimidated, Lee-Ann offers to do this as part of her custom service.

But what if you really, really don’t want to cut up your nice bra? Sigh. I understand. Good-fitting bras are hard to come by. There is a way to clone it while leaving it intact. Beverly Johnson describes the process very well in her book, The Bra-maker’s Manual. Since she’s done such a thorough job of explaining it, you should read Beverly's book or the article she wrote for the Feb/March 2002 issue of Threads magazine.  I’m going to give you a condensed photographic version of the way I did it. (Clicking on photographs will enlarge them.)

Supplies: pattern paper (I use a roll of medical paper), thick corrugated cardboard box or foam-board, pencil, and straight pins. Cover the cardboard/foam-board with a generous piece of the pattern paper.

I am working with an underwire bra with a band that encircles the entire ribcage. Each cup has three pieces: a black lace upper cup, a solid black inner lower cup (closest to center front), and a solid black outer lower cup (closest to underarm).

Photo 1: Lower inner cup pinned along seamline
Photo 1: I removed the wire from one cup by picking out the stitches sealing the top edge closed. Then I carefully pinned the inner lower cup to the paper-covered foam-board. I pinned on the seamline (not the topstitching), making sure the fabric was smooth but not stretched. The pins created a rough outline of the shape. To define the shape better, I made little pin stabs along the seamline between the stationary pins. As well, I pin-traced the grainline showing the direction of the greatest stretch (aka DOGS).


Photo 2: The pin-marked outline being traced with pencil
Photo 2: After I pin-traced around the entire perimeter of the lower cup, I carefully removed the pins and lifted off the bra. Hopefully you can see the faint pin-mark outline of the lower inner cup. Immediately, before anything shifted, I traced the pin-mark outline with a pencil. Here, the left line has been pencil-traced.


Photo 3: pin-markings are traced in pencil and labelled
Photo 3: The entire inner lower cup's pin-marks have been pencil-traced and labelled. It's easy to forget how the pieces align with each other. I like to label the wire-line, the cross-cup seam that links the upper cup with the lower cups (incorrectly labelled in this photo, but corrected later), and the mid-cup seam, which joins the inner and outer lower cups. Also pencil-marked is the DOGS (degree of greatest stretch).


Photo 4: The outer lower cup's shape
Photo 4: Outer lower cup (the one closest to the underarm) has been pin-traced, pencil-marked, and partially labelled. The straight line in the middle of the cup shows the DOGS.This is the traced shape of the outer lower cup.


Photo 5: The upper cup being pin-traced in sections
 Photo 5: I hope you can see details of the upper lace cup in the middle of being pin-traced. The upper cup was too big and too curvy to capture its shape without distortion. (Remember: keep the fabric flat and unstretched!)  I worked in sections, being extremely careful not to accidently move the bra when I moved from one section to the next. (I removed the pins from the farthest completed edge, leaving the pins nearest the unmarked section still in place. It's delicate work.) 


Photo 6: All the pieces traced
Photo 6: All the bra pieces (band, cup, strap attachment) marked and partially labelled.


Photo 7: Lines smoothed, seams trued, seam allowances added
Photo 7: The finished pattern with the intact bra. Once all the pieces were traced, I smoothed the lines, then trued them to make sure adjoining pieces were the same length. Then I added seam allowances - usually 3/8"/1cm but sewn at 1/4"/.6cm. This is to allow for turn-of-cloth. You'd think in such fine fabric the turn-of-cloth allowance would not be necessary - but it is! Sometimes I use larger seam allowances for the cross cup seam (joining upper and lower cups) and the mid-cup seam (joining inner and outer lower cups) for just-in-case fitting space. Unfortunately, the bigger the seam allowance, the harder it is to sew the pieces together.


Photo 8: One more look at the finished pattern
Photo 8: One more peek at the finished pattern.


Clear as mud? As I said in the first paragraph, cloning a bra is more art than science. I hope you enjoyed my first pictorial tutorial!

               - Lady T

Saturday, February 18, 2012

Kitty for the Teacher

Apples are the traditional gift for teachers. Fortunately for me, sewing students are usually more drawn to fabric than fruit. One of my students made me this adorable kitty pincushion. Isn’t it the cutest notion ever! Thank you, BB! I love it!


Here are my lovely ladies, hard at work.


Focused on the project


Brad Pitt walks into the room


                         - Lady T

Tuesday, February 14, 2012

Happy Love Day


Lacy underwear and Valentine's Day go together like beaches and bikinis. So on this day of romance, it seems appropriate that I am working on a bra.

Alas, it's not for me.

It's not an actual bra; it's a pattern for one. I'm cloning RTW bra for a friend. She's in a class I'm teaching later this week on how to sew bras. Normally my students work with a Kwik Sew pattern, but this is a special friend, and she really, really likes this bra, so I'm going to do my best to help her duplicate it.

I hope you have romance, friendship, and love in your life today.

                        Lady T

Saturday, February 11, 2012

Goldilocks' Jeans, A Sewing Fairytale

Once upon a time, there lived a (middle-aged) girl named Lady T Goldilocks. One fine day, she wandered into her sewing workshop and decided to sew a perfect-fitting pair of jeans. With a heart full of optimism and a hand full of denim, she started off.


Snip, snip went her scissors. Whirl, whirl went her Singer. A spool of golden topstitching thread later, she was done. So she slid them on.

“Oh no!” she cried, when she zipped them up and spied the funny things happening to her midriff fluff. “These are too small! They would fit Baby Bear.”

Poor Goldilocks was so disappointed! All that hard work! Project 3 was a disaster.

Gathering her supplies, Goldie tried again. (I told you she was a stubborn miss.) Determined to do better, she grabbed her best fitting books. Betzina, Palmer/Pletch, and Zieman had much good advice to give. Carefully Goldilocks altered her pattern, widening the waist and lengthening the crotch curve.

Snip, snip went her scissors. Whirl, whirl went her Singer. A spool of golden topstitching thread later, she was done. So she slipped them on.

“Oh no!” she cried, when she zipped them up and they slid down. “These are too big. They would fit Papa Bear if he didn’t mind wearing girly jeans.”


Poor Goldilocks was so disappointed. All that hard work! Project 4 was another disaster.

How sad, how sad, how sad. She stomped around her workshop. Bloggers Beth, Debbie, and Peter had made sewing great fitting jeans look so easy. It wasn't!

Finally, Little Miss Goldilocks sat her tuffet, comforting herself with a bowl of curds and whey. Along came Self-doubt, the Spider, who sat down beside her, and chased Goldilocks’ pluck clean away.

So, gentle reader, is this the end of the story, or just today's installment? Is Goldilocks an idiot for starting this project like the spider said?

Will she squash that spider, find her mojo and try again? Or will she head straight for the mall?

But the big question is: Will poor Goldilocks ever have jeans that fit “just right”?

-      Lady T

Tuesday, February 07, 2012

Something Fun

The tack (whack) buttons: stars, swirls, and pearl-inset
My stud muffin returned home bearing gifts – including more stud-like things! He brought me several styles of jean buttons, aka tack buttons. (Personally, I think they should be called whack buttons because you hammer them on.) He and DD3 scoured Toronto’s fabric district to find my treasures.


While perusing the fabric stores, they came across some fabulous non-stretch denim. Bless their hearts, they rummaged through the piles and found me three beauties: dark wash, pale pink, and flowered denim. I’m especially tickled with the flowered denim. They’re about to become jeans. Yes, flowered jeans. Even though I know people will point and snicker whenever I wear them, I want, want, want them. There’s no accounting for some people’s taste.

My new denims: dark wash, baby pink, pink flowered
The baby pink denim has a soft spot in my heart. When I was in elementary school, I desperately longed for blue jeans. My mother was horrified – only laborers wore jeans – not little girls. Girls wore skirts or dresses, or on the rare occasion, slacks. (This was right before the hippy movement propelled denim into the fashion world.) Tomboy that I was, prissy slacks just didn’t cut it. One day, the unimaginable happened – my mother brought me home a pair. They were pink jeans, her nod to femininity.

Fast forward two-and-a-half decades. The tomboy is now the mother of two little girls and one baby girl. Mom and I go shopping, and what do we find – pink jeans, identical to the ones I had! Plus matching pink jean jackets! My mom whisked two sets to the cash register and before you could say Bob’s your uncle, both girls were dressed from head-to-toe in pink denim.  In time, they passed their outfits down to their younger sister, so I have sweet memories of all three of my daughters wearing pink jeans.

Once again, fast forward two-and-a-half decades. Pink denim has reappeared my life. Is there any doubt about what I’m going to make with it?


                   -      Lady T

Saturday, February 04, 2012

The Dream vs Reality

What’s the biggest difference between a dream and reality? In a dream, everything is perfect. In reality, there are flaws. Lots of them.

In case you haven’t guessed, I’m talking about my newly finished jeans, Trial Pair #1, made from Stretch and Sew #716, the Trouser Jean.

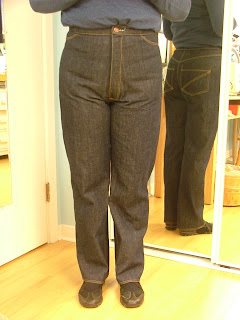
Included for your viewing pleasure (and amusement) is the front view. Yep, they’re Mom jeans. Exactly what I wanted; the top of the waistband covers the bellybutton. I’m thrilled to say this is the one area where dream and reality overlapped.  

The legs do not thrill me. I thought I was getting a straight leg. Instead they taper. Easy fix. Next time, I will widen the leg from hip to hem.


Now the picture you’ve all been waiting for – the backside. Hmmmm. There’s still a lot of fabric at the back of the leg. I definitely don’t like the decoration on the pockets. (Or maybe it’s just the butt they are resting on.)

Front and back, the fit around the crotch doesn’t look great. I will ponder the wrinkles a bit more.

But the biggest problem is the waistband. Inserting it really changed the fit and the comfort level. Before the waistband addition, my pants slid up and down my rectangular body, free-floating so to speak. Afterwards, the pants were locked in place. Cinched in waist is too mild a description. When I sit, my soft spare tire is pushed up and out, much like a tavern wench’s  bosom in her corset. It feels just as bad as it looks!

All in all, I give them a C-. Sort of wearable but not great. Mind you, they are a great diet/exercise incentive. I liked them better when they were a dream.

So ends Project 3.